

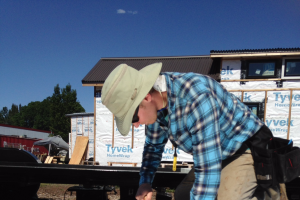
Great progress before lunchtime!
Our tiny house build has begun! On Sunday Isha and I moved our tools down to our build site at Green Anchors. It was May Day and seemed an auspicious day to start a project like this! Yesterday we kicked off our first Build Blitz and with the assistance of two great Tiny House Helpers, we made great progress on our floor system.
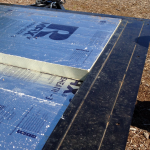
We started out Build Day #1 yesterday with intros, safety, and a site orientation. Then we started cutting our 1/2″ pressure treated plywood to fit inside the trailer frame, spanning the cross ribs, which are dropped to the bottom so that we have the full 6″ cavity to work with. We used one full sheet of ply and ripped four of them to about 47″ and one to 42″ wide to get them to land properly on the trailer ribs. Once they’d been dry fitted we put a bead of sealant down underneath them and sealed the plywood in place with a bead of sealant from the top, too. (If I’m feeling super ambitious I may also crawl around under the trailer and seal up the seams from the bottom, too. Then again, I may decide this is good enough…)
Andy cutting foam board insulation
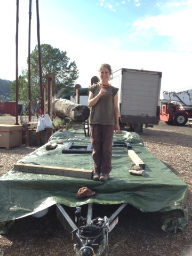
Next we crosscut our 2 1/2″ polyisocyanurate insulation to length so that it would fit into the trailer frame. We ripped the first sheet in half so that the insulation seams would be staggered from the sealed seams of the PT ply. Then we crosscut our 3″ polyiso insulation to length, inserting them with the seams staggered from the first layer. We ripped our last piece to fit in, just so. Our 79 1/2″ measurement fit really nicely without us having to shoehorn the insulation into place. I’ve often spray foamed the gaps, too, but we didn’t have gaps big enough to spray foam so we skipped the foam! Since we’re well air sealed, we should be in pretty good shape here.
We wrapped up the day by gluing our pink seam seal to the trailer frame so that the wooden bottom plates and the OSB subfloor won’t be in direct contact with the metal of the trailer. Then we tarpped the trailer and packed the tools in for the day. A good day’s work!
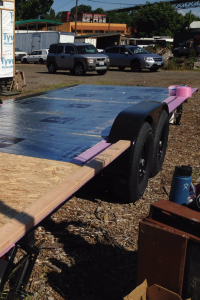
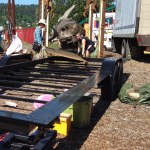
Mocking up bottom plates, subfloor, and installing seam seal
You might have noticed that our tiny house floor system doesn’t have a wooden joist system inside the trailer frame. That wooden floor system is important if you’re using fiberglass insulation and need supports for your subfloor. However, I’ve never figured out why it would be necessary if you’re using rigid foam insulation since foam board insulation has decent compressive strength. So we’ve basically made a SIP inside the trailer frame because we used a 1/2″ PT ply undercarriage as the bottom skin, 5 1/2″ polyiso foam as the insulation, and then 3/4″ T&G OSB subfloor as the top skin. We didn’t glue the pieces to each other, so they’re not structural the way they would be if they were a true SIP. However, we have gravity working with us here, so it would take a pretty major event to separate them again!
Day 1 Done!
This floor system is how I built the floor system for The Lucky Penny, too. You can read about that in Floor Box Lessons Learned and My Floor Box Continued. Back in 2014, I’d never heard of anyone else doing it this way, but I figured building a SIP inside the trailer frame would save weight, time, materials, and cost over doing a wooden floor system. Additionally, it would reduce thermal bridging and provide more insulation which means better energy efficiency. The only drawback is that since my homemade SIP isn’t structural, without those supports every 16″ to 24″ on center, there is a little more give in the floor. I suppose we could have gone up to a thicker (and therefore more rigid) subfloor, but it would have been heavier, more expensive, and would have taken away just a little more headroom. Fortunately, I found that once I installed my flooring in The Lucky Penny, the give isn’t very noticeable anymore. This floor system worked the first time, so we’re doing it again.
-
- Installing the first piece of undercarriage
-

- Sonja ealing the subfloor into place
-

- Sonja smoothing sealant at the seams
-

- The undercarriage installed and sealed
-

- Great progress before lunchtime!
-

- Andy cutting foam board insulation
-
- The second layer of foam insulation
-
- Mocking up bottom plates, subfloor, and installing seam seal
-

- Day 1 Done!
Hey Lina,
Thanks so much for sharing about your floorbox! I am in the process of removing my current subfloor and insulation in order to redo my floorbox and am wondering…why did you go for ply over the Alupanel you used last time - was this to keep keep the floorbox vapor open? I am trying hard to understand if vapor permeable or totally sealed is the best approach for the “foundation”.
Also, what informed your choice for the polyiso? I would really like to use polyiso as well but have heard its R value decreases as the temp lowers and also as it ages, which has me wondering a bit.
Much gratitude for you great blog! Tatiana
Hi Tatiana, keep up the good work on reworking your floor box! Yes, as I told Les, I was hesitant to use metal in the floor box because I’ve heard of people having trouble with water getting trapped there and rusting the metal and rotting out the system. We’re still developing best practice so we’ll have to just figure it out all together! That’s why I’m so glad there are lots of people sharing their experiences! (Oh, and I also had more room this time to fill with foam insulation!) We picked the polyiso insulation for the floor because it has such a high R-value and the floors are the area where our bodies will be in contact with the shell of the house. We wanted them to be as insulated as possible! We also live in a pretty mild climate, so that helps!
Great start to your build and thanks for sharing your build with the THOW community. Curious any reason why you are not including flashing on the underside of the trailer frame?
Hi Les,
Thanks for your comment and your question. I’m not doing flashing on the underside of the trailer frame because the pressure treated plywood is there instead. I’ve heard of several people having issues with water being trapped inside the floorbox, so I was hesitant to have that be a metal surface. There are lots of people doing it lots of different ways and the whole current wave of tiny house builds are so new we’re still developing best practice. We’ll have to figure it out together! Do you have a tiny house? How are you doing yours?
Hi Lina
I’m in the planning phase and most plans you find use metal panels. What I really like about your approach is it is simple, well insulated, and the cost is minimal. I will be in a cold climate so insulation is a key for me as is cost and everyone has to focus on costs. I had not thought about moisture in the floor and it makes sense that both interior and exterior moisture would move to the lowest point. I’m wondering if there are any lessons about moisture control that we could use from home crawl space construction methods. I will try to do some internet searching to see what I can find.
A big thank you to Andy and Sonja for helping us with the house!
I am intrigued by that pink seam seal. What is it called?
Hi Spring! I think at the hardware store I went to it’s just called Sill Seal: http://www.homedepot.com/p/Owens-Corning-Foam-SealR-Sill-Plate-Gasket-5-1-2-in-x-50-ft-2FS/202080947.